As promised, here is my Vintage Solid Granny Squares blanket all finished and DONE! I really enjoyed making it over the last 3 months, it has moved house with us and now has gone to live at mum's in Cumbria, it was her Christmas present and I think she loved it!
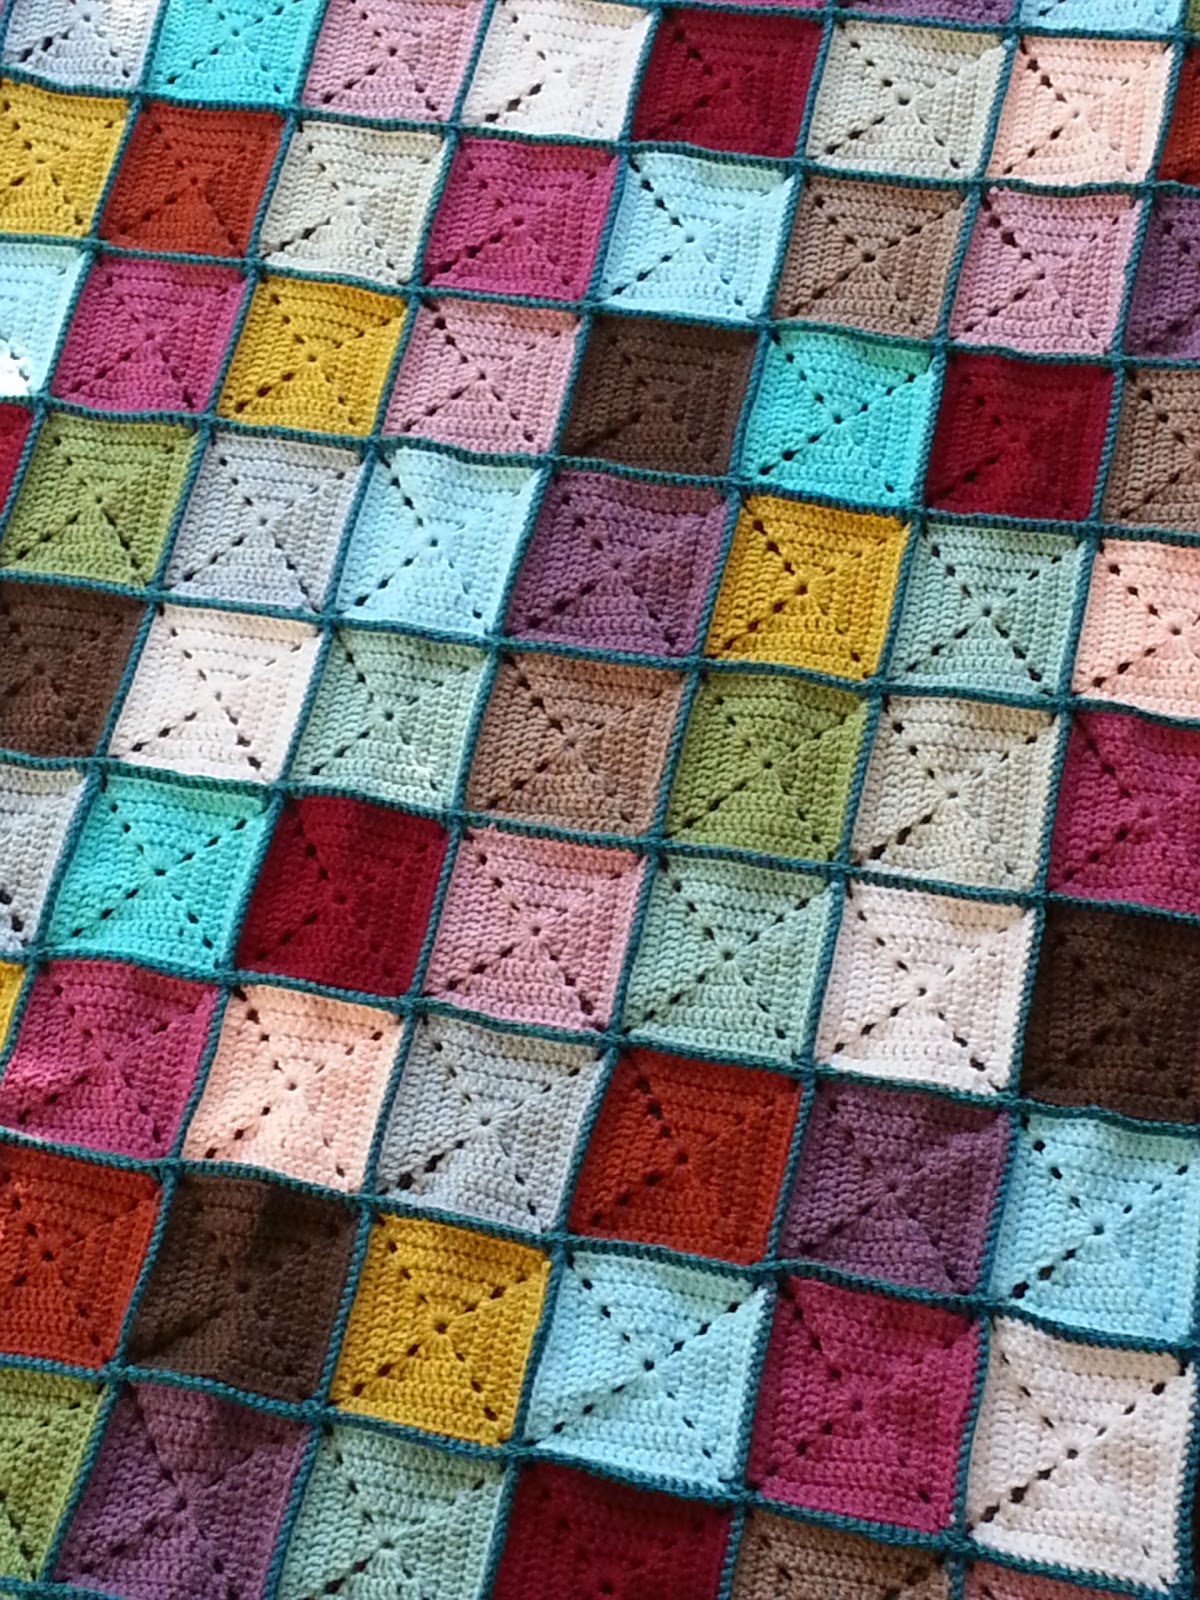
There are 16 colours of mainly Stylecraft Special DK for the squares and the 17th is teal used to do the double crochet join (just the inner two loops wrong sides together) and the border. It tones with mum's patchwork quilt and living room colours, although the gold is a bit off the wall. The colours are listed at the bottom of this post here. I forgot to take a picture in the room it was designed for.

The squares are from Little Tin Bird's lovely Elmer or Solid Granny Squares pattern, I got addicted to them making the Provencal style gingham cushion.

The border was made up as I went along, as far as I can make out, a round of treble in teal, then double crochet in pale rose (I alternate direction working the border so it doesn't curl) then treble chain etc the third round in teal, then double crochet all around in Mint, then a staggered treble chain space round again, then double crochet in grape then a round of trebles in teal and I finally finished off with Attic 24's picot border again, just like on the cushion.

I love these neat squares, more so than ordinary granny squares, they seem more contemporary. One can be worked up in 20 minutes and carrying a ball of yarn around is so easy.

I loved the way they sat in piles on the footstool, I kept counting them.

However joining them all together, so the slightly different sized squares looked the same size, was very satisfying. I do find random very difficult though. I approached it in a Sudoku style, a colour should only appear in a column or a row just once, occasionally twice.

Here come some more gratuitous pictures, wish I could do the fancy photography others manage!


The tree was up when the border was being finished off.

FINISHED SIZE: I forgot to measure, each square was about 10cm so about 180cm x 130cm I should think with join and border.
YARN: Stylecraft Special 100% acrylic Double Knit in 15 colours, each square is about 15m yarn. Mint and gold were other makes as they were colours lacking in Stylecraft. 17 in total. Colour inspiration was from the super talented Sandra of Cherry Heart fame and her Giant Grannie Patchs blanket
Mocha 1064
Copper 1029
Meadow 1065
Silver 1203
Gold (King Cole Big Value DK 323)
Mint (Stylecraft Life DK 2342)
Pale Rose 1080
Sherbet 1034
Claret 1123
Parchment 1218
Apricot 1026
Raspberry 1023
Soft Peach 1240
Grape 1067
Walnut 1054
Aspen 1422
Finally Teal 1062
Hook: 4mm
PATTERNS: Solid Granny Squares (or Elmer Squares) pattern by Little Tin Bird
The border was as described above finished off with Picot Edging by Attic 24
HOOKY HAPPY INDEX: 9/10
Links to the One a Day/Tuesday Tallies posts on my Vintage Granny progress are here:
Vintage Solid Granny Blanket Week 1
Vintage Solid Granny Blanket Weeks 2 and 3
Vintage Solid Granny Blanket Week 4
Vintage Solid Granny Blanket Week 5
Vintage Solid Granny Blanket Week 6
Oh wow it's totally gorgeous. Love it and might just have to copy you!!! Xxx
ReplyDeleteCopy away, I copy lots of inspiring people!
DeleteOh my, was it really 3 months? It seemed so much shorter. Well that shows, if you are not the one involved, time flies by (same with pregnancy, mine seemed to last forever although Little Guy was "only" 5 days overdue).
ReplyDeleteI'm really interested in what you did for the border, it looks awesome!
Thank you, was about 6 weeks as I did finish mid December. Border was just cobbled with Lucy's lovely picot edge to finish, I have described it in the post.
DeleteHi Fiona, love your blanket....the colours and joining are gorgeous.
ReplyDeleteJacquie x
Wow - what a beautiful blanket. Well done (love the border) and lucky Mum. xx
ReplyDeleteYour Mum's blanket looks great! I really love the border and the combination of colours. I think finishing it in 6 weeks is super fast. And I think your photos are great too, especially the 8th one down where it's all in a heap. Well done!!!! Sam xx
ReplyDeleteI love it Fiona! Your mum must be so pleased! I think you managed random very well, the colours look very well balanced in the photos :)
ReplyDeleteKaren xx
But is it not cheating sort of planning your random?
DeleteGorgeous Fiona!!
ReplyDeleteIt's stunning! I've been following you and the rest of the CAL on the Ravelry Lucy group and I think your blanket is so distinctive. Really beautiful, you must be very proud and your mother must be thrilled!
ReplyDeleteThank you, come and join in the cal!
DeleteSo gorgeous. It must feel great looking at the finished product. Did you find the joining more tedious with smaller squares?
ReplyDeleteThe joining was OK, the squares were not that small and by crocheting together in long strips it means far fewer ends to darn in!
DeleteFiona.. bravo.. that is wonderful! Who will get this treasure? For you or who?
ReplyDelete((hugs)), Teresa :-)
It was my mum's Christmas present Teresa, thank you.
DeleteBeautiful. I think the colours you chose work really well together and despite you saying you don't do random very well I think it looks really balanced. Great tip about the border. I'll have to remember that. I bet your Mum loved it and there is nothing wrong with your photos!
ReplyDeleteLinda manta.
ReplyDeleteLinda combinação de cores.
Parabéns.
Um maravilhoso 2013.
This is beautiful, Fiona : -)
ReplyDeleteMolly and I are really impressed with your blankets. She has been knitting this weekend, but now she's thinking about crocheting. Unfortunately, I dont crochet so I can't teach her that.
ReplyDeleteI have just found your blog via Ravelry while looking for inspiration for my next project, this is a really beautiful blanket
ReplyDeleteLove how it turned out! I've been working on a similar one with a slightly different granny square variation but I'd been at it since February! You work much faster then I! But seeing how great yours came out makes me want even more to finish mine up to see how it turns out. ~Katy
ReplyDeleteYour blanket is beautiful...especially loving the border! I would like to copy this on a babette blanket but can't figure out one part. What do you mean by "treble chain space round"? I did a google search but can't find directions for it. Thank you in advance for your help!
ReplyDeletePam
Hi Pam...All I mean is a treble then a chain to miss out the next treble.....the teal rows after pink and mint on the border if you look closely. The second 'squares' row is offset from the first. I made it up as I went along! Hope thatchers a bit. Fiona
DeleteOMGoodness...you are so awesome! Your explanation has cleared my confusion. Thank you so very much for sharing!!!
DeleteHi I am just starting one of these. Love yours! How did you deal with the slightly different sized squares as I notice a couple of mine are a bit bigger/smaller than the others, not by loads but a little bit. Thanks xx
ReplyDeleteMine were slightly different sizes too, it seems the different colours have slight variation in Stylecraft, Crochet is very forgiving, as long as you line up each stitch when joining they all bed down perfectly happily. Hope that helps! Fiona
DeleteThis comment has been removed by a blog administrator.
ReplyDelete